
Summarize Blog
Quick Summary
New to BDD testing? Learn how to set it up in Jira using AIO Tests with this easy, step-by-step walkthrough made for beginners.
Behavior-Driven Development (BDD) testing bridges the gap between technical and non-technical teams. Using simple, natural language (like Gherkin syntax), BDD allows everyone to understand and contribute to test scenarios.
For agile teams working inside Jira, adopting BDD makes even more sense. Jira is already the hub where stories, bugs, and tasks live. Bringing BDD test cases into Jira connects test plans directly with user stories and development workflows, making everything traceable and easy to manage.
BDD in Jira can get messy without the right setup; testing teams struggle with collaboration, scattered cases, and unclear ownership. AIO Tests simplifies BDD with built-in support in Jira, enabling teams to create, manage, and run test cases seamlessly without context switching.
In this guide, we'll walk you through the step-by-step process of implementing BDD testing in Jira using AIO Tests.
What is Behavior Driven Development (BDD)?
Behavior-driven development testing is a collaborative approach that bridges the gap between business stakeholders, developers, and QA teams. It focuses on defining expected application behavior in plain, understandable language, making test scenarios accessible to everyone.
Key aspects of BDD include:
- Behavior-driven development testing ensures test cases reflect real user behavior rather than just technical requirements.
- BDD test case management helps teams create, organize, and maintain test cases linked to user stories, improving clarity and reducing miscommunication.
- It allows seamless integration with Jira, connecting test cases to stories, bugs, and sprints for complete traceability.
- Supports both manual testing and automated testing, giving teams the flexibility to run and track scenarios efficiently while choosing the right approach for each test.
Encourages collaboration between QA, developers, and stakeholders, enhancing alignment and speeding up delivery cycles.
Why AIO Tests for BDD Testing in Jira?
AIO Tests is a QA testing and test management tool for Jira. This AI-powered platform helps teams plan, organize, execute, and track all types of testing from manual to automated results and BDD scenarios covering the entire test lifecycle seamlessly within your team's daily workflow. The native Jira integration eliminates complex setups and sync issues, enabling QA teams to manage BDD test cases and effortlessly link them with Jira stories, bugs, and sprints.
How AIO Tests simplifies BDD testing:
- Gherkin Native Support: Write and manage BDD scenarios using Gherkin syntax inside Jira. This keeps scenarios clear and readable for both technical and non-technical team members.
- Import and Export Feature Files: Seamlessly import existing feature files to create test cases or export BDD scenarios from AIO Tests into feature files. This bidirectional capability streamlines synchronization between automated and manual testing efforts.
- Execution and Reporting Built-In: Execute BDD scenarios manually or via automation pipelines. Track execution status and view detailed reports inside Jira, ensuring full traceability and transparency.
- i18n Support: AIO Tests supports over 80 languages compatible with Gherkin, allowing teams to write BDD scenarios in their native language using Gherkin keywords.
Step-by-Step Guide to Implement BDD Testing in Jira Using AIO Tests
1. Create a BDD Test Case in AIO Tests
The first step in your step-by-step BDD implementation in Jira with AIO Tests is to create a BDD test case. AIO Tests supports the Gherkin syntax, which uses the Given-When-Then format that makes test cases easy to read for everyone.
- Access Test Case Creation: Navigate to AIO Tests within your Jira instance. From the project or test cycle, click on Create Test Case.

- Choose BDD/Gherkin Format: When prompted, choose the BDD/Gherkin option for the test case format. This will automatically set up the structure for writing Given-When-Then steps.
- Define Test Steps:
- Given: Establish the initial conditions for the test (e.g., "Given the user is logged in").
- When: Describe the action that triggers the behavior (e.g., "When the user clicks on the 'Submit' button").
- Then: Outline the expected result (e.g., "Then the system should display a success message").
- You can use And/But to include additional conditions or actions in the test case, making it more flexible.
- Given: Establish the initial conditions for the test (e.g., "Given the user is logged in").

- Save and Link Test Case: After completing your test steps, save the test case. AIO Tests automatically link it with Jira issues (user stories, bugs, etc.) for traceability.

2. Create Scenario Outlines with Examples
BDD testing allows you to parameterize your test cases by using Scenario Outlines.
- Edit Existing Test Case: After creating a base test case, open it for editing.
- Add Scenario Outline: Select the Scenario Outline option, which lets you define parameters that will replace specific values in your test steps.
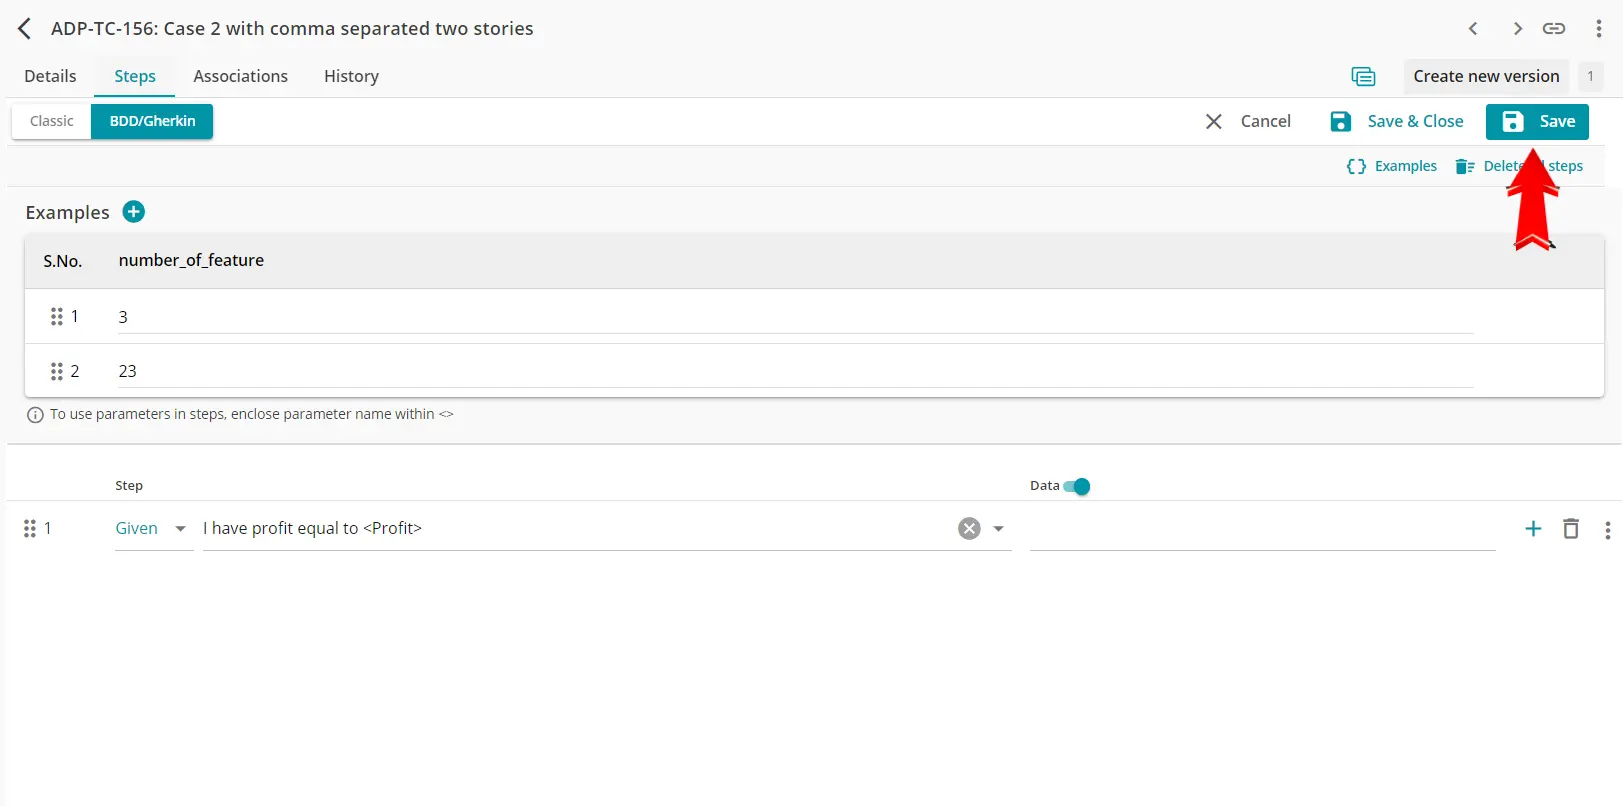
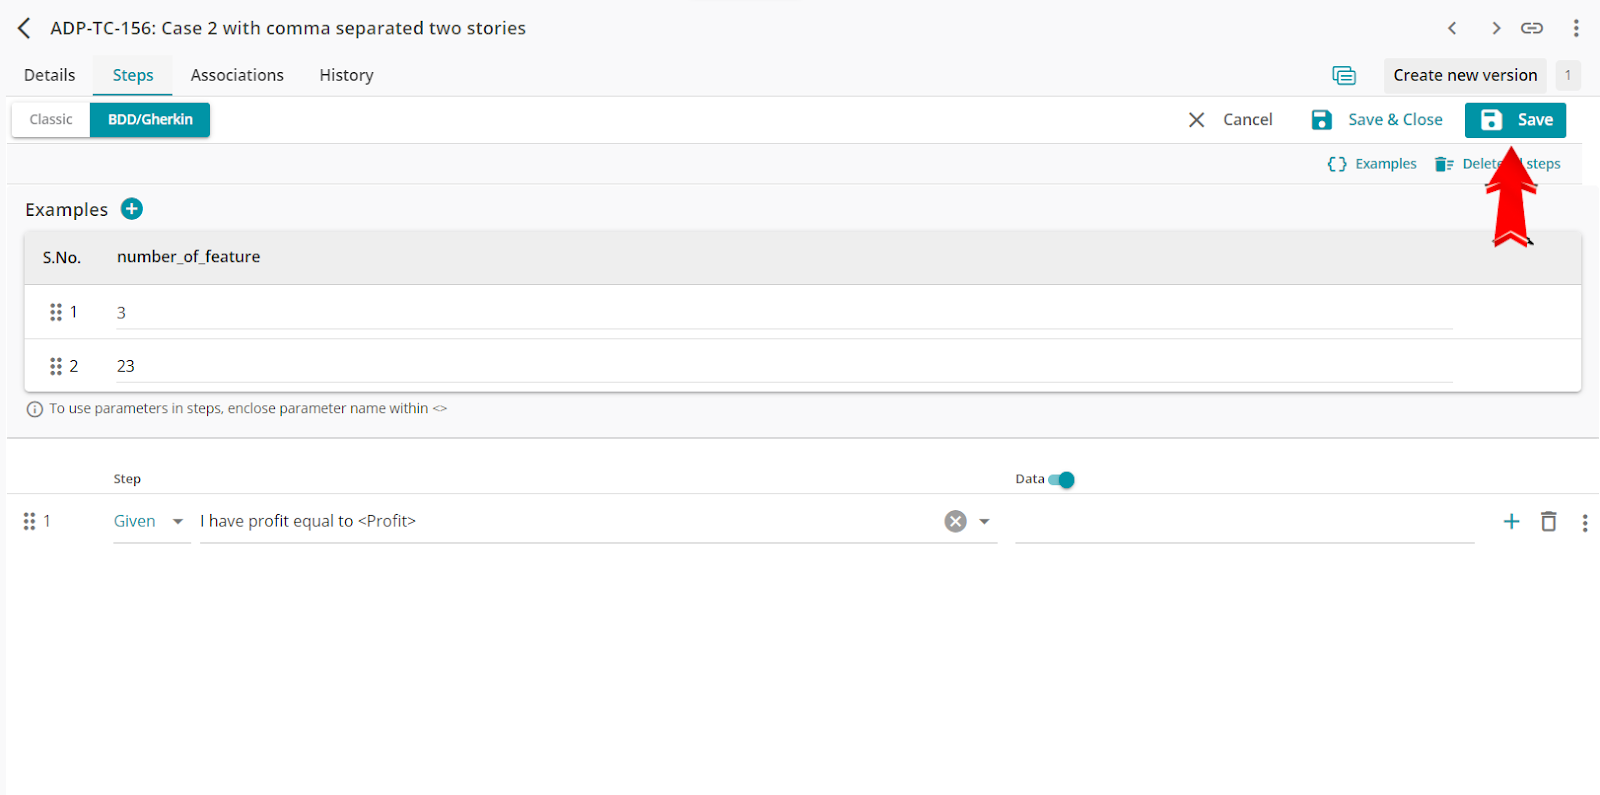
- Add Examples: Under each Scenario Outline, create an Examples table where you list the different parameter values that you want to test. This allows you to reuse the same test case structure while testing various conditions.

- Click the plus sign (+) to add parameters. Type the name into the 'New parameter name' field, then click 'Add'

- Enter the values of the parameters.

- Save Changes: After defining the parameterized test case, save the test case to apply the scenario outline. You can now run the same test with different inputs.
Executing a Dataset-Based Test Case in a Cycle
1. Viewing Dataset-Based Cases in a Cycle
In the Cycle screen, both dataset and non-dataset test cases are listed. To filter only dataset-based cases:
- Use the “Datasets” filter from the toolbar.

3. Running the Test Case
To execute a dataset-based test case:
- Expand the Test Case: Click the carat icon (>) next to the test case in the cycle view.
- Automatic Run Creation: The system generates 'Run 1' automatically.
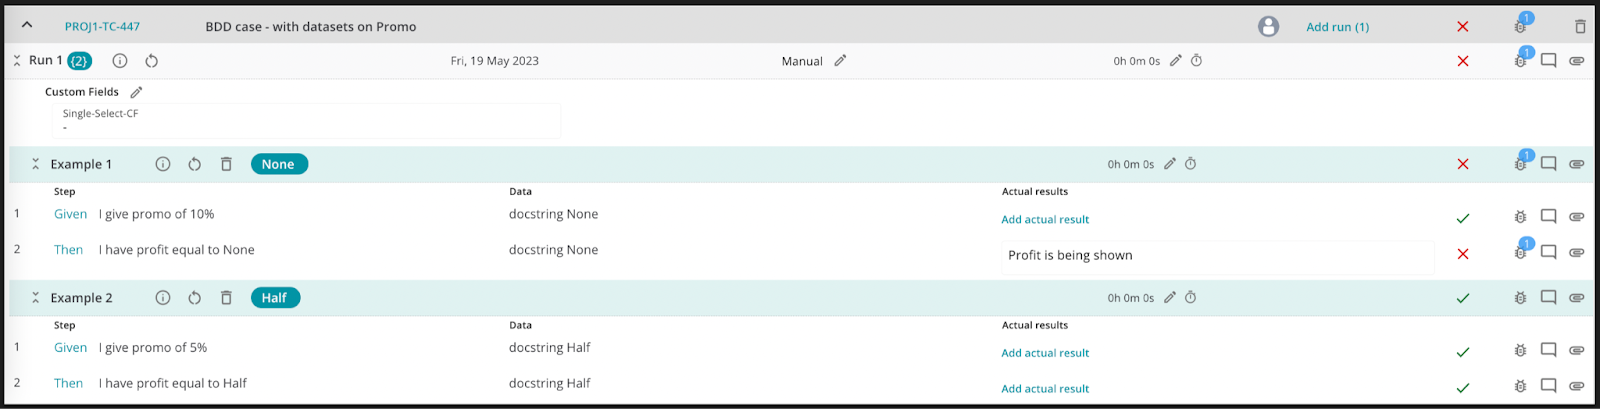
- Dataset Executions: Each dataset defined in the test case results in a separate execution within the run.
In the cycle screen, this means a single test case appears as multiple executions—one for each dataset allowing individual tracking and management.


5. Dataset Row Breakdown
Each dataset execution in AIO Tests can have its own status, effort, comments, defects, and attachments. While datasets can be deleted from a run, the last dataset cannot be removed.
If the last dataset needs to be deleted, it implies that the entire case or run is no longer required, necessitating the removal of the whole case or run.

- Row Number: Indicates the position of the dataset within the test case. If a dataset is deleted (e.g., Dataset 2), the numbering adjusts accordingly, displaying Datasets 1 and 3.
- More Details Icon: Provides details such as execution and creation timestamps for the dataset execution.
- Reset Dataset: Clears all statuses, comments, attachments, step results, and defects for the selected dataset.
- Delete Dataset: Removes the specific dataset from the run, recalculating the overall effort and status. Note:
- Effort: Logs the actual effort expended on the dataset execution. The cumulative effort of all datasets contributes to the total run effort.
- Timer: Initiate the timer at the dataset level to monitor the execution time for that specific dataset.
- Status Selector and Display: Assign a status (e.g., Passed, Failed) to the dataset. This status influences the overall run status based on predefined percolation rules.
- Defects: Log defects encountered during the dataset execution. These are aggregated at the run level and can be viewed in the defects summary.
- Comments/Attachments: Add comments or attach files to the dataset execution.
6. Dataset Execution Steps
Expanding a dataset row reveals its steps, with dataset values highlighted within each step for clarity. Users can interact with each step by:
- Adding Actual Results: Click the “Add actual result” link to input outcomes for each step.
- Use the status icon to set the step's execution status. This status influences the dataset, run, and overall case status based on percolation rules.
- Click the defects icon to report any issues encountered during the step.
- Use the comments icon to add notes or tag team members for collaboration.
- Click the attachments icon to upload supporting files or evidence related to the step.

7. Execution Status & Status Percolation
Users can set the execution status such as Not Run, In Progress, Blocked, Passed, or Failed by clicking the status icon at the Case, Run, Dataset, or Step level in the cycle details page. This flexibility allows for status updates at any level of granularity.

8. Capturing Evidence and Effort
Users can log effort, add comments, report defects, and upload attachments at the dataset level, just like in regular runs.
Effort logged for each dataset execution is automatically rolled up to the run level. Users can manually override the total effort by editing the time in the run row.

Instead of entering effort manually, users can trigger a timer at the dataset level to capture execution time.

Defects raised at the dataset level are visible at the run level.

Defects logged at the run level are also reflected at the dataset level.

Defects at the dataset level are handled in the same way as for the dataset level as well.

Steps to Create a BDD Case By Pasting Scenario
Step 1: Start by clicking the Create option in the top menu and choosing Case from the dropdown.

Step 2: Select the Create from Scenario button to continue.

Step 3: A pop-up window will appear; paste your scenario into the space provided.

Step 4: Hit the Convert button to proceed.

Step 5: The system will automatically populate the necessary fields on the Create Case screen. To review the test steps, click Add Steps.

Step 6: Once everything looks good, click Save & Close to finish.
Apart from the easy creation of BDD cases, AIO Tests also offers features like copying steps from other cases and duplicating cases at the click of a button, streamlining the process of switching from classic to BDD cases.
Conclusion
In this blog, we’ve seen how AIO Tests, with its native integration into Jira, makes implementing BDD testing efficient. By combining Gherkin syntax, easy test case management, and real-time execution and reporting within Jira, AIO Tests allows teams to collaborate, execute, and track their BDD tests.
If you’re ready to streamline your BDD testing and improve collaboration across your development and testing teams, AIO Tests is the perfect solution. With its seamless Jira integration and advanced features it takes the complexity out of BDD implementation.
Get started today by booking a demo to see how AIO Tests can transform your testing workflows and simplify BDD implementation.

FAQs
- How does Cucumber and Jira integration improve test automation?
Integrating Cucumber with Jira allows teams to link BDD scenarios directly to Jira issues, creating a single source of truth for requirements, test cases, and automation results. This improves traceability, reduces manual effort, and ensures that automated tests reflect real user behavior accurately.
- Why is behavior-driven development testing important for Agile teams?
Behavior-driven development testing aligns development and QA with business requirements. Agile teams benefit because BDD focuses on defining expected behaviors in plain language, which enhances communication, reduces misunderstandings, and ensures that testing supports rapid, iterative development cycles.
- What are the benefits of using BDD test case management in Jira?
BDD test case management in Jira helps teams organize, track, and maintain test cases efficiently. Key benefits include:
- Linking test cases to user stories and bugs for full traceability
- Easy parameterization with scenario outlines for reusable tests
- Real-time reporting and execution tracking directly within Jira
- Reduced context switching between testing tools and development workflows
- Can BDD testing in Jira support both manual and automated testing?
Yes, BDD testing in Jira supports both manual and automated executions. Teams can manually validate test scenarios or run automated pipelines while maintaining a single view of results, making it easier to track coverage, execution status, and defects across all tests.
- How does BDD test case management improve collaboration between QA and developers?
BDD test case management promotes collaboration by making test scenarios understandable to both QA and development teams. With Gherkin syntax and Jira integration, everyone can contribute, review, and execute tests, ensuring shared understanding, faster feedback, and smoother Agile workflows.


